【Kubernetes】VirtualBoxにUbuntu(×2~3台)たててローカルにKubernetes環境を構築してみる
割とよく見るやつだし、実際自分で1~2年前に1回やったことあるのだが、それから大分時間が空いてることもあり、改めて勉強や復習及び未来の自分が同じことやりたくなった場合の備忘録(これが一番大きい)を兼ねて。
- 最終的に目指す(というか結果的に出来上がった)構成・超概略図
- 環境
- 作業前提条件
- [1] Masterノードの作業
- [2] Workerノード作成・参加
- [3] Masterノードでアプリケーションのdeploy
- [4] Workerノードを追加する
- [5] Masterノードでの追加作業1(アプリケーションの改修とdeploy)
- [6] Masterノードでの追加作業2(haproxy)
- おわりに
最終的に目指す(というか結果的に出来上がった)構成・超概略図
こんな感じになりました。
センスがないのは勘弁してください。
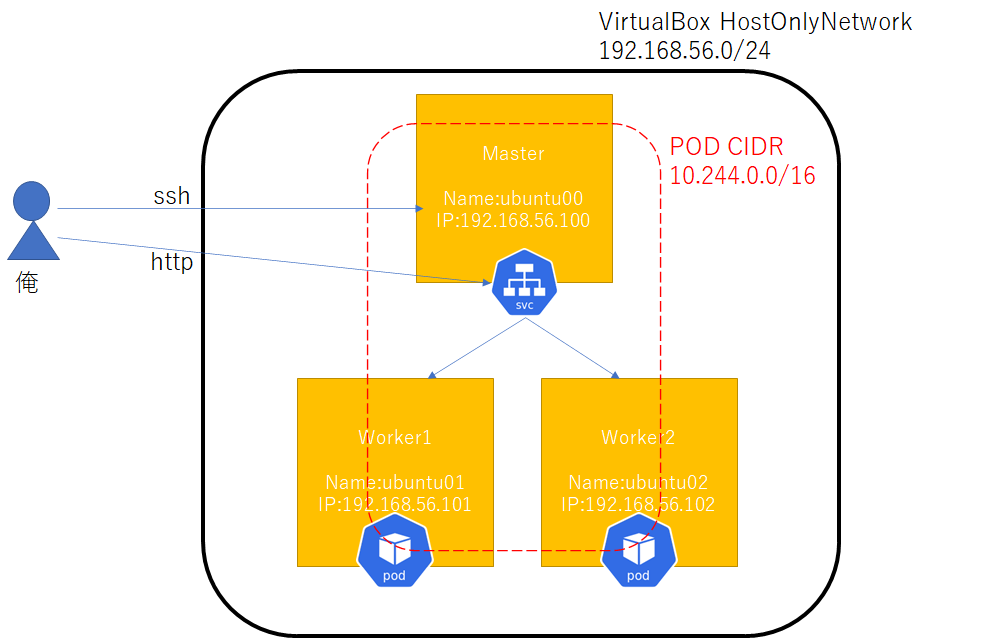
- Kubernetes関連のアイコンはこちらのgithubから。
- Master×1、Worker×2。ノードのOSは全部Ubuntu
- 各ノードの仮想マシンは全部VirtualBox上で作成して起動して立ち上げる
- アプリの開発(というほどのものはないが)、deploy等は全部Masterノード上で実施する
- その他ローカルのDockerレジストリやServiceへのバイパス役となるhaproxyもMasterノード上で立ち上げる
環境
- ホストOS : Windows 10 Home
- ホストOSのVirtualBox : バージョン 6.1.16 r140961 (Qt5.6.2)
- ゲストOS : Ubuntu 20.04
- ゲストOSで使ったDocker : docker://20.10.0
- ゲストOSで使ったKubernetes : v1.20.0
作業前提条件
ホストOSにVirtuakBoxがインストールされていること。
基本こんだけ。
[1] Masterノードの作業
1-1.Ubuntuのセットアップ
(1)
Ubuntuの公式ホームページからUbuntu ServerのISOイメージを入手してくる。
DesktopとServerの2種類あるが、今回はServerのほうを使う。

(2)
VirtualBoxを起動し、[仮想マシン]→[新期]

(3)
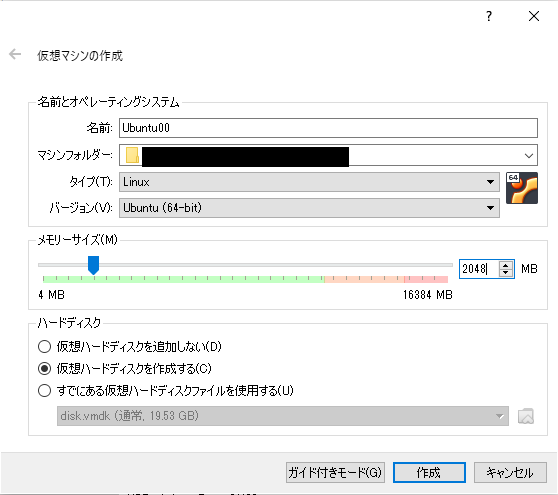
名前、マシンフォルダー、メモリーサーズ等を指定する。
ここでは名前は「Ubuntu00」、メモリーサーズは2048MBとする。
「作成」を押して次画面。
VDIファイルを新規作成する場所を確認して「作成」。

(4)
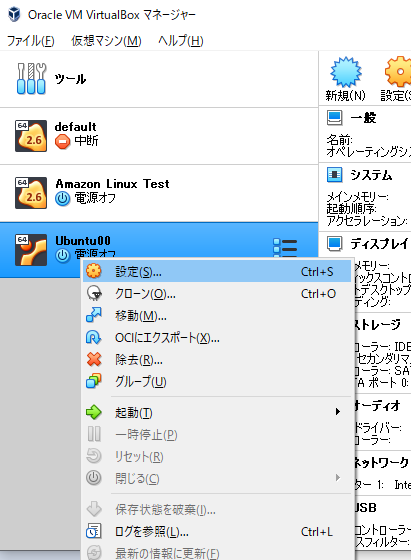
出来上がった仮想マシンを選択して右クリック→「設定」
(5)
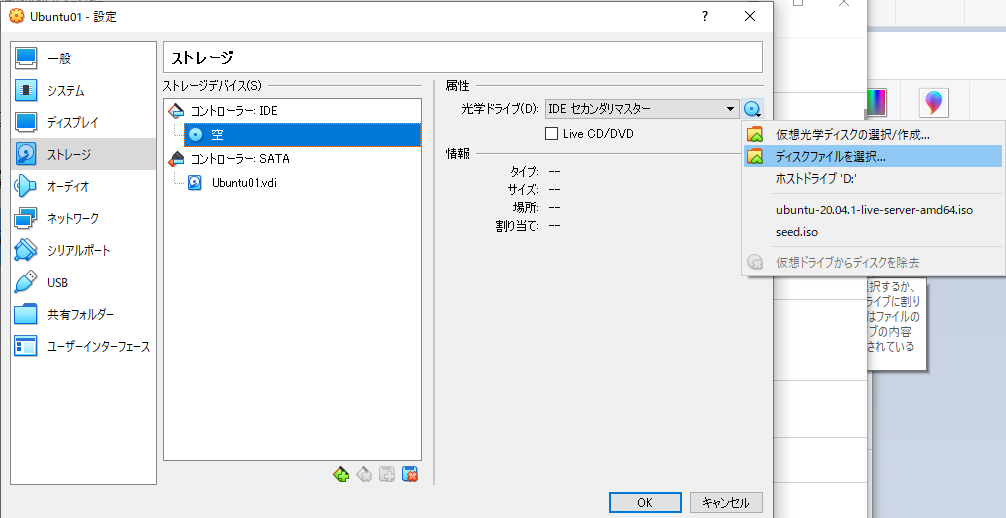
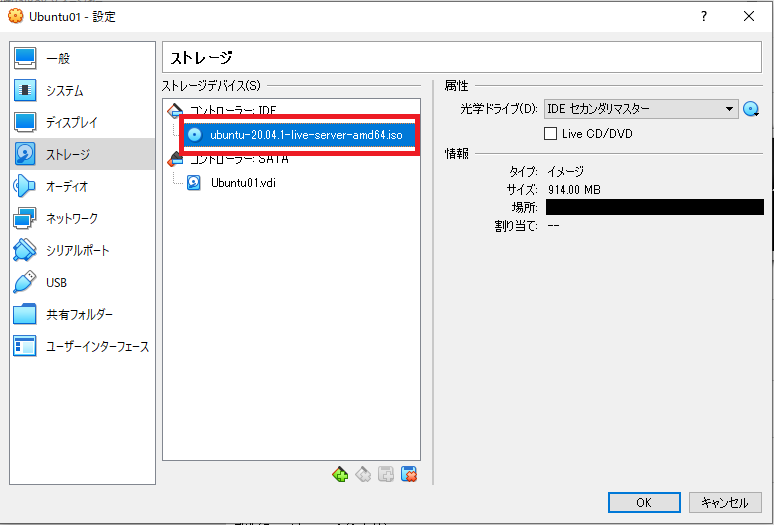
「ストレージ」→「コントローラ:IDE」の下にある「空」を選択→右側の「光学ドライブ」のDVDみたいなアイコンクリックして「ディスクファイルを選択」
↑の1.でダウンロードしてきたUbuntuのISOイメージを選択。

(6)
「システム」→「プロセッサー」のタブに移動しプロセッサー数を最低2以上にする(ここでは2)
※Kubernetesがインストール条件がCPU数最低2からである(1でインストールすると怒られた)。

(7)
「ネットワーク」→「アダプター2」タブで「ネットワークアダプタを有効化」のチェックを付けて、「割り当て」を「ホストオンリーアダプター」を選択

ここにはVirtualBoxの「ファイル」→「ホストネットワークマネージャ」で表示されるネットワークアダプタが選択肢として表示される。
いずれを選択するかでIPアドレスの設定が変わる。
基本的にデフォルトでホストオンリーアダプターを使う場合は192.168.56.1/24になるらしい。
ここでもそれを使う。
(8)
仮想マシンを選択して右クリック→「起動」→「通常起動」
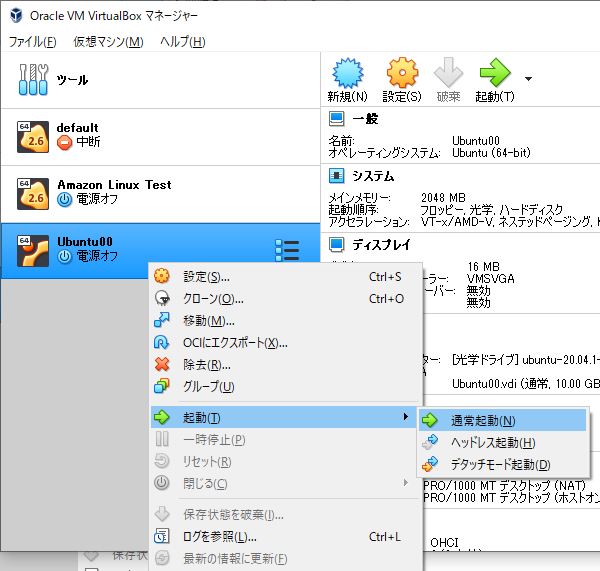
起動直後、5.でISOイメージを選択しているにもかかわらず、起動ディスクをわざわざ選択させるポップアップウィンドウが出ることがあるが、間違えないようにububntuをリストの中から選択すること。
何も考えずOK押してたらそのままホストOSのディスクドライブを指定させられたことになって「起動ディスクがねーよ」と怒られたときがあった。
当たり前だぜ!
(9)
ここからしばらくUbuntuの初期設定画面が続く。
まずは言語。
日本語はないので仕方ないので「English」

(10)
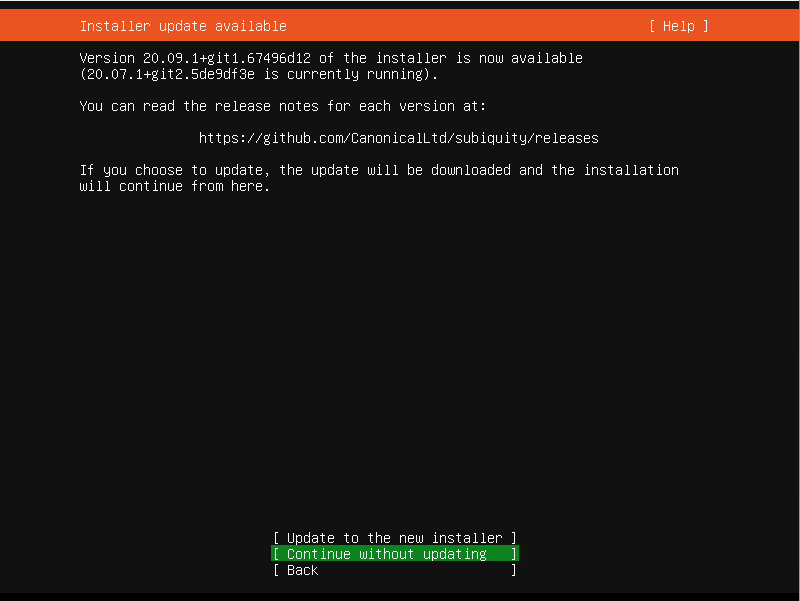
Installer Update Availableはデフォルトのまま「Continue without updating」
(11)
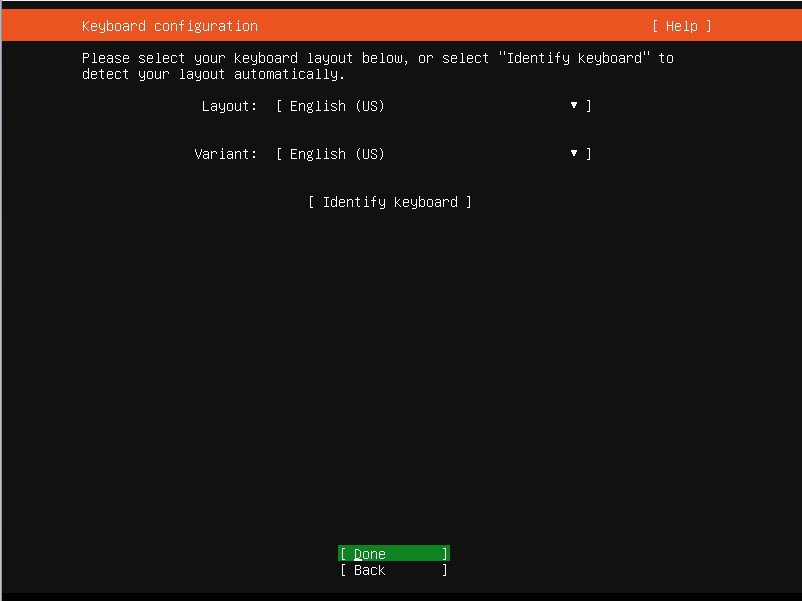
Keyboard Configurationは「English(US)」のまま「Done」
(12)
network Connectionsでは下のほうの設定(画像でいうenp0s8)を選択して「Edit IPv4」を選択
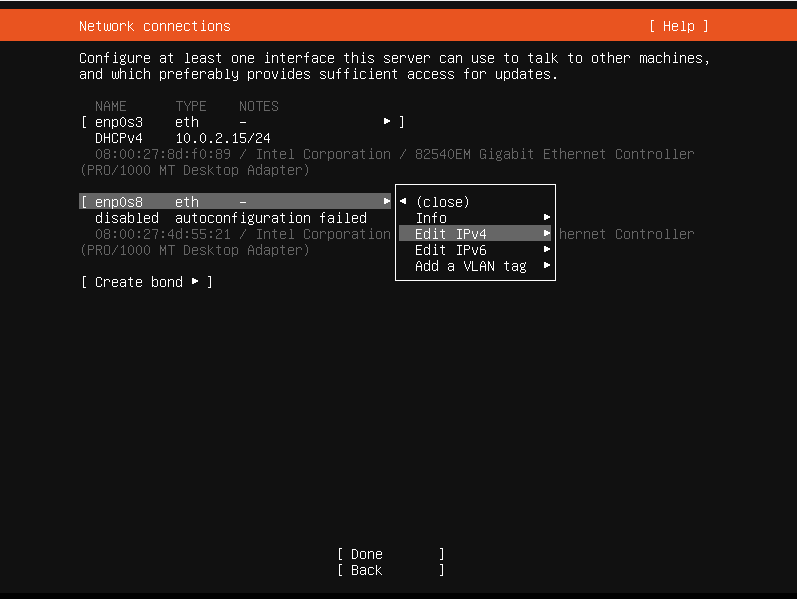
(13)
Subnetは7.で選んだホストオンリーアダプターのネットワークアドレスに依存する。
Addressはその中で固定IPを一つ選んで設定する。
後に出てくるマシン名が「Ubuntu00」なのでIPアドレスも「192.168.56.100」にした。
それ以外にあまり意味はない。
この辺は好みなので好きな設定をして構わないと思う。

参考までに、私の入力値は以下。
以後の記事の内容もこれに従う。
| 項目 | 値 |
|---|---|
| Subnet | 192.168.56.0/24 |
| Address | 192.168.56.100 |
| Gateway | 255.255.255.0 |
| Name Servers | 192.168.56.0 |
で、「Save」。
元の画面に戻ってくるので「Done」。
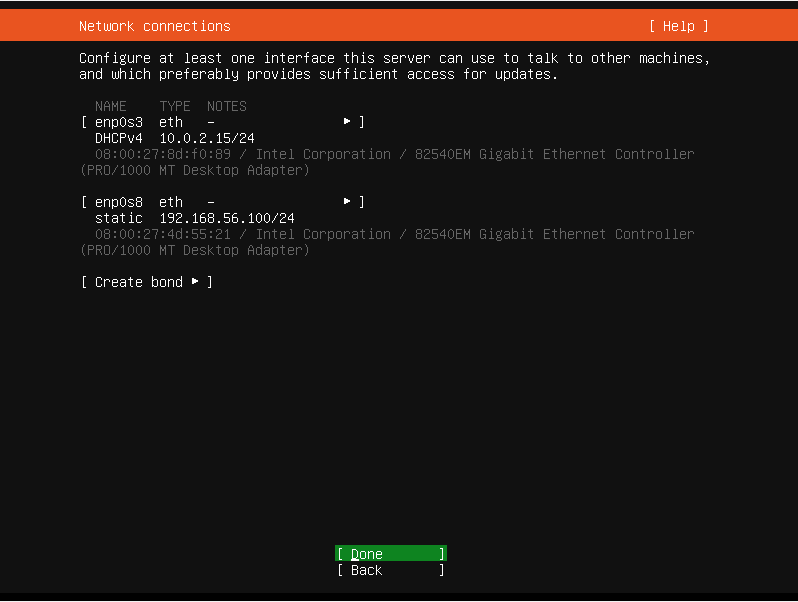
(14)
Configure proxyは何も入力せず「Done」。
必要な場合はいれてください
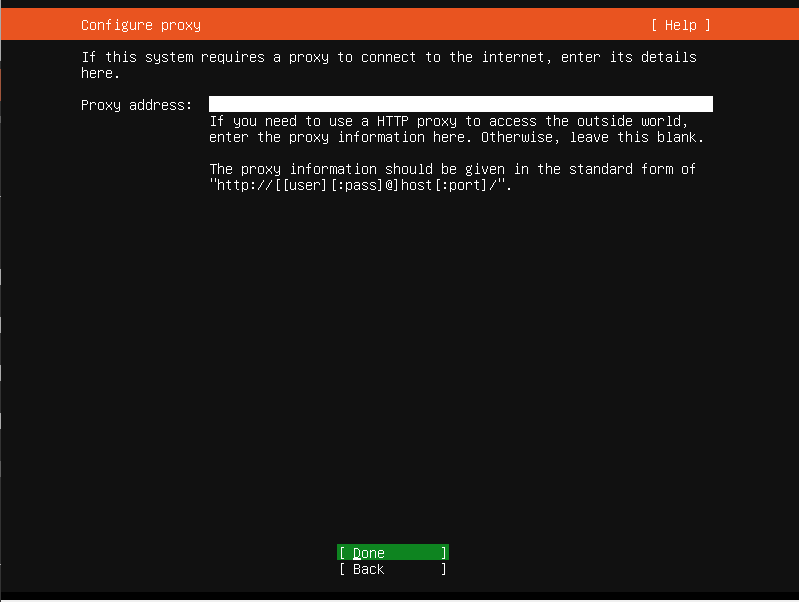
(15)
Configure Ubuntu archive mirrorは何も変更せず「Done」。
必要な場合は変更してください
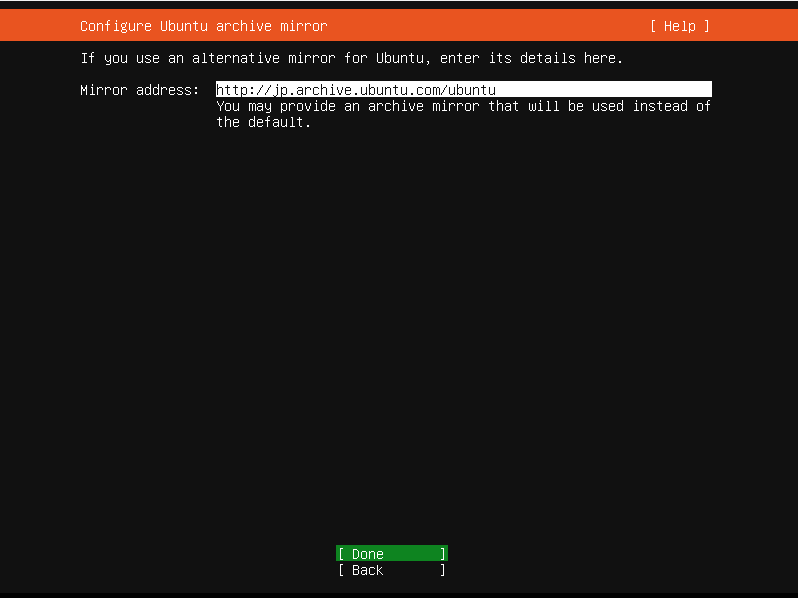
(16)
Guided Storage configurationも何も変更せず「Done」。
必要な場合は変更してください
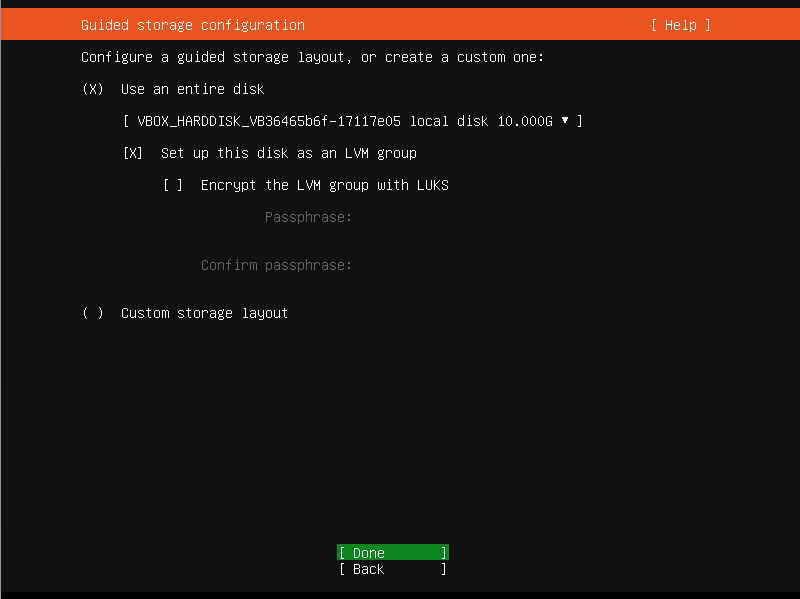
(17)
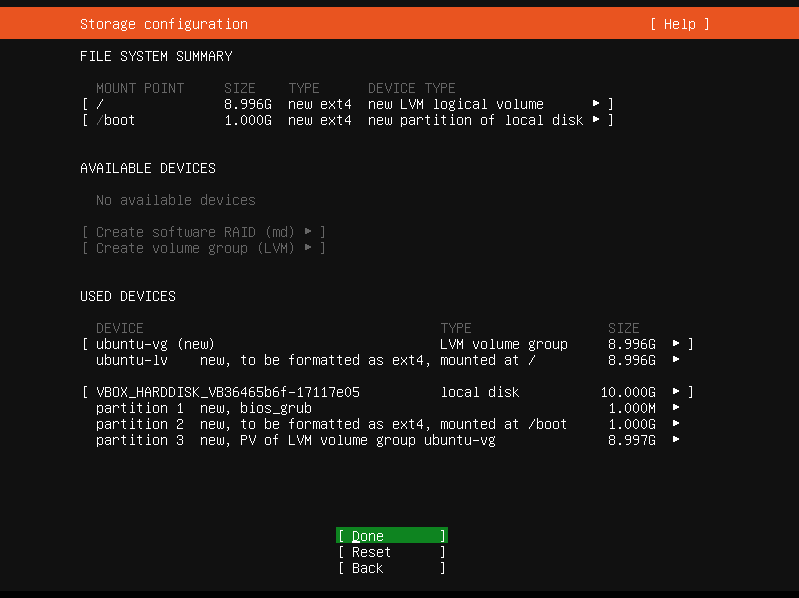
Storage Configurationも何も変更せず「Done」。
このあと「もう戻せないけどいいね?」とか聞いてくるけど迷うことなく「Done」。
(18)
profile setupではサーバー名や初期ユーザーを設定する。
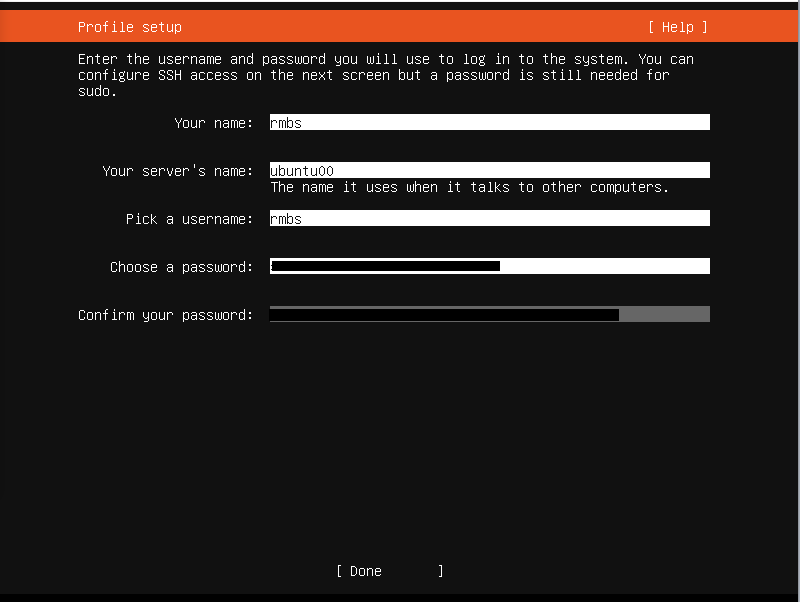
とりあえず私は以下のようにしました。
| 項目 | 値 |
|---|---|
| Your name | rmbs |
| your server's name | ubuntu00 |
| pick a username | rmbs |
正直ここも好みなので好きにしていいと思う。
ちなみにrmbsは私のハンドルネーム「rm /(rm_blank_slash)」の略である(どうでもいい)
ただサーバー名(ここでいうubuntu00)は後々使うので覚えておくこと。
(19)
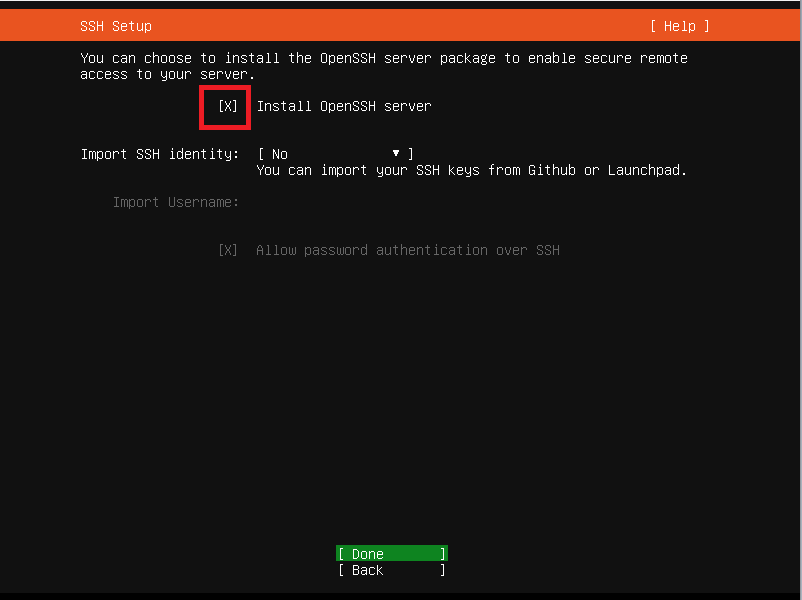
SSH Setupだって!
へぇ~、初期設定時にsshいれといてくれるのか?
昔(といっても1年くらい前だが)はこんなんなかった気がするなあ。便利。
もちろん「Install OpenSSH Server」をEnterしてチェック(Xマーク付けばOK)する。
なお鍵の指定もここで出来るらしいが、今回は指定しない。
(20)
Featured Server Snapsでは、「docker」が目を引く。
が、ここではあえて何も選択せず「Done」。

ここで「docker」を選ぶと、どのVersionのをいれるかさらに選択する画面に移り、そこでインストールするVersionのdockerを選択して先に進むと、実際dockerがインストール済・デーモン起動済みの状態でサーバが起動する。
OpenSShも同様だが、サーバ入った後にいちいち手動で apt-get install docker-ce とかしなくて済むのはありがたい…
と、思ってたのだが、ここで入れたdocker、よくわからんデーモンで動くことになり、先々面倒くさいので(実際面倒くさかった、というかよくわからなかったw)、後で自分でいれることにする。
(21)
Installing Systemの画面。Ubuntuセットアップ完了までしばらく待つ。(15分くらい?)
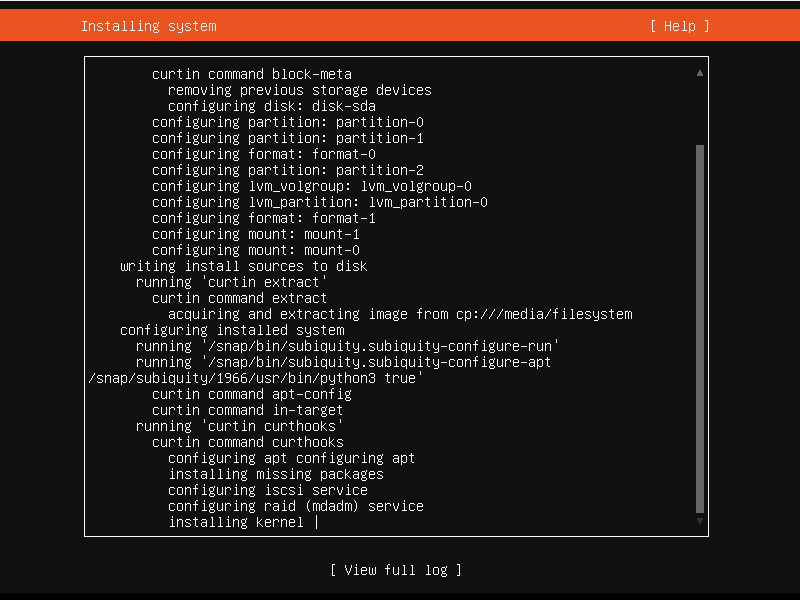
セットアップが完了すると「Reboot」が選択肢に表れるので、押す。
(22)
(17)で指定したユーザーとパスワードでログインする。

(23)
(18)でOpenSSHいれておけば、ここでsshのサービスもあがってるのを確認できる(sudo systemctl status ssh)

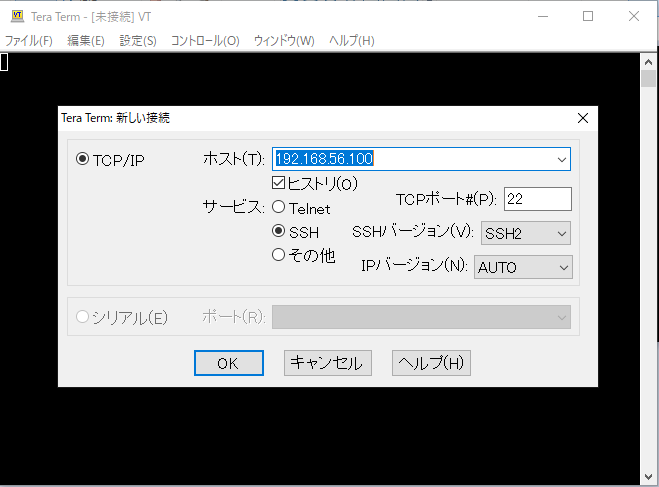
なので、Tera Termなどのターミナルを使って(ssh経由で)サーバにアクセスできる。
個人的にこっちのほうが慣れてるので以後はTera termで作業していくことにする。
1-2.Install Docker
基本的には公式のDocの内容にそのまま沿う形。
(1)
まずはいつものお決まりapt-get updateちゃん
$ sudo apt-get update
(2)
前提条件で必要なやつらをインストール
$ sudo apt-get install \
        apt-transport-https \
        ca-certificates \
        curl \
        gnupg-agent \
        software-properties-common
(3)
鍵を登録
$ curl -fsSL https://download.docker.com/linux/ubuntu/gpg | sudo apt-key add -
(4)
fingerprintを確認
$ sudo apt-key fingerprint 0EBFCD88
pub   rsa4096 2017-02-22 [SCEA]
      9DC8 5822 9FC7 DD38 854A  E2D8 8D81 803C 0EBF CD88
uid           [ unknown] Docker Release (CE deb) <[email protected]>
sub   rsa4096 2017-02-22 [S]
(5)
リポジトリ追加
$ sudo add-apt-repository \
    "deb [arch=amd64] https://download.docker.com/linux/ubuntu \
    $(lsb_release -cs) \
    stable"
(6)
お決まり
$ sudo apt-get update
(7)
docker-ce等インストール
$ sudo apt-get install docker-ce docker-ce-cli containerd.io
(8)
基本これで終わり。
なお、冒頭に挙げた公式のDocだと、Versionを指定して必要なものを選択して(指定のversionのものを)インストールしなおすこともできるよ、とのこと。
$ apt-cache madison docker-ce
 docker-ce | 5:20.10.0~3-0~ubuntu-focal | https://download.docker.com/linux/ubuntu focal/stable amd64 Packages
 docker-ce | 5:19.03.14~3-0~ubuntu-focal | https://download.docker.com/linux/ubuntu focal/stable amd64 Packages
 docker-ce | 5:19.03.13~3-0~ubuntu-focal | https://download.docker.com/linux/ubuntu focal/stable amd64 Packages
 docker-ce | 5:19.03.12~3-0~ubuntu-focal | https://download.docker.com/linux/ubuntu focal/stable amd64 Packages
 docker-ce | 5:19.03.11~3-0~ubuntu-focal | https://download.docker.com/linux/ubuntu focal/stable amd64 Packages
 docker-ce | 5:19.03.10~3-0~ubuntu-focal | https://download.docker.com/linux/ubuntu focal/stable amd64 Packages
 docker-ce | 5:19.03.9~3-0~ubuntu-focal | https://download.docker.com/linux/ubuntu focal/stable amd64 Packages
この中の「5:20.10.0~3-0~ubuntu-focal」みたいな部分を抜き出してsudo apt-get install docker-ce=<VERSION_STRING> docker-ce-cli=<VERSION_STRING> containerd.ioの<VERSION_STRING>部分をその文字列で置き換えるのだ。
たとえばこの中で2行目のやつをインストールしたい場合は、Docに則って
sudo apt-get install docker-ce=5:19.03.14~3-0~ubuntu-focal docker-ce-cli=5:19.03.14~3-0~ubuntu-focal containerd.io
とすれば19.03のverがインストールされる。
これをしない場合は最新Ver=今回の記事執筆時で20.10が自動的に選択されてインストールされた状態になる。
以後のDockerは20.10がインストールされた状態で進める。
だが、Kubernetes的には(少なくともこの作業時点では)このDockerのVersionは「有効なDockerのVersionではない」として、Kubernetesインストール時に警告が出た。
だから本来的にはこの段階でdockerのversionを慎重に選択しておいた方がいい。
ただもう個人的には面倒くさいのでこのまま先に進む。w
(9)
hello-worldで動作確認。
$ sudo docker run hello-world
Unable to find image 'hello-world:latest' locally
latest: Pulling from library/hello-world
0e03bdcc26d7: Pull complete
Digest: sha256:1a523af650137b8accdaed439c17d684df61ee4d74feac151b5b337bd29e7eec
Status: Downloaded newer image for hello-world:latest

Hello from Docker!
This message shows that your installation appears to be working correctly.

To generate this message, Docker took the following steps:
 1. The Docker client contacted the Docker daemon.
 2. The Docker daemon pulled the "hello-world" image from the Docker Hub.
    (amd64)
 3. The Docker daemon created a new container from that image which runs the
    executable that produces the output you are currently reading.
 4. The Docker daemon streamed that output to the Docker client, which sent it
    to your terminal.

To try something more ambitious, you can run an Ubuntu container with:
 $ docker run -it ubuntu bash

Share images, automate workflows, and more with a free Docker ID:
 https://hub.docker.com/

For more examples and ideas, visit:
 https://docs.docker.com/get-started/
うむ、動いてる。よさそう。
(10)
いちいちsudoつけるのが面倒くさいので、ユーザーグループ追加する。
$ sudo usermod -aG docker rmbs
これで一度sshから出て、もう一度入り直す。
以後はsudoなしでdockerが叩けるようになっているはずである。
試しにdocker imagesとか叩いて確認してみる。
$ docker images -a
REPOSITORY    TAG       IMAGE ID       CREATED         SIZE
hello-world   latest    bf756fb1ae65   11 months ago   13.3kB
よさそう。sudoなしで実行できた。
(11)
デーモンをsystemdに変更する。
/etc/docker/daemon.jsonというファイルを用意して以下の内容を記述する。
sudo vi /etc/docker/daemon.jsonを実行してviエディタを開き、以下内容を記述して保存。
{
      "exec-opts": ["native.cgroupdriver=systemd"],
      "insecure-registries": [
      "localhost:5000"
      ]
}
dockerデーモン再起動。
sudo systemctl daemon-reload
sudo systemctl restart docker
一応、sudo systemctl status dockerでdockerが正常に起動したか確認しておく。
1-3.Install Kubernetes
(1)
sysctl.confに1行追記する。
一応バックアップとっといて…
sudo cp -rp /etc/sysctl.conf /etc/sysctl.conf.bk
viで編集
sudo vi /etc/sysctl.conf
最下部に以下一行追記して:wq!
net.bridge.bridge-nf-call-iptables = 1
反映させる。
sudo sysctl -p
sudo swapoff -a
swapoffは別にここでやる必要はないと思われるが、これやっとかないとkubeletがちゃんと起動しないようなので、ここでやっておく。
(2)
鍵を登録
curl -s https://packages.cloud.google.com/apt/doc/apt-key.gpg | sudo apt-key add -
(3)
リポジトリ追加
sudo apt-add-repository "deb http://apt.kubernetes.io/ kubernetes-xenial main"
(4)
いつもの。
sudo apt update
(5)
Kubeadmインストール
sudo apt install kubeadm
(6)
kubeletの設定ファイルをいじくる。
まず一応バックアップをとっといて…
cp -rp /etc/systemd/system/kubelet.service.d/10-kubeadm.conf /etc/systemd/system/kubelet.service.d/10-kubeadm.con.bk
※ファイル名は違うかも。
/etc/systemd/system/kubelet.service.d/配下にある.confファイルである。
中を開いて「Environment=」の並びに以下一行追記する。
KUBELET_EXTRA_ARGS=--node-ip=192.168.56.100 --resolv-conf=/run/systemd/resolve/resolv.conf
こんな感じ↓になるはず
# Note: This dropin only works with kubeadm and kubelet v1.11+
[Service]
Environment="KUBELET_KUBECONFIG_ARGS=--bootstrap-kubeconfig=/etc/kubernetes/bootstrap-kubelet.conf --kubeconfig=/etc/kubernetes/kubelet.conf"
Environment="KUBELET_CONFIG_ARGS=--config=/var/lib/kubelet/config.yaml"
Environment="KUBELET_EXTRA_ARGS=--node-ip=192.168.56.100 --resolv-conf=/run/systemd/resolve/resolv.conf"
# This is a file that "kubeadm init" and "kubeadm join" generates at runtime, populating the KUBELET_KUBEADM_ARGS variable dynamically
EnvironmentFile=-/var/lib/kubelet/kubeadm-flags.env
# This is a file that the user can use for overrides of the kubelet args as a last resort. Preferably, the user should use
# the .NodeRegistration.KubeletExtraArgs object in the configuration files instead. KUBELET_EXTRA_ARGS should be sourced from this file.
EnvironmentFile=-/etc/default/kubelet
ExecStart=
ExecStart=/usr/bin/kubelet $KUBELET_KUBECONFIG_ARGS $KUBELET_CONFIG_ARGS $KUBELET_KUBEADM_ARGS $KUBELET_EXTRA_
デーモンリロードとkubeletの再起動。
$ sudo systemctl daemon-reload
$ sudo systemctl enable kubelet
$ sudo systemctl restart kubelet
一応sudo systemctl status kubeletで無事に起動できたか見てみましょう
(7)
kubeadm initする。
ちなみにroot以外だとsudoつけないと怒られる。
sudo kubeadm init --apiserver-advertise-address=192.168.56.100 --apiserver-cert-extra-sans=192.168.56.100 --node-name ubuntu00 --pod-network-cidr=10.244.0.0/16
色々オプションついてるが、これは過去の自分の実績からである。
ここ最近の、同じようなことをやってる他の人の記事等を見てみると最低限--pod-network-cidr=10.244.0.0/16があればよさそうである。
実行時の標準出力:
[init] Using Kubernetes version: v1.20.0
[preflight] Running pre-flight checks
        [WARNING SystemVerification]: this Docker version is not on the list of validated versions: 20.10.0. Latest validated version: 19.03
[preflight] Pulling images required for setting up a Kubernetes cluster
[preflight] This might take a minute or two, depending on the speed of your internet connection
[preflight] You can also perform this action in beforehand using 'kubeadm config images pull'
[certs] Using certificateDir folder "/etc/kubernetes/pki"
[certs] Generating "ca" certificate and key
[certs] Generating "apiserver" certificate and key
[certs] apiserver serving cert is signed for DNS names [kubernetes kubernetes.default kubernetes.default.svc kubernetes.default.svc.cluster.local ubuntu00] and IPs [10.96.0.1 192.168.56.100]
[certs] Generating "apiserver-kubelet-client" certificate and key
[certs] Generating "front-proxy-ca" certificate and key
[certs] Generating "front-proxy-client" certificate and key
[certs] Generating "etcd/ca" certificate and key
[certs] Generating "etcd/server" certificate and key
[certs] etcd/server serving cert is signed for DNS names [localhost ubuntu00] and IPs [192.168.56.100 127.0.0.1 ::1]
[certs] Generating "etcd/peer" certificate and key
[certs] etcd/peer serving cert is signed for DNS names [localhost ubuntu00] and IPs [192.168.56.100 127.0.0.1 ::1]
[certs] Generating "etcd/healthcheck-client" certificate and key
[certs] Generating "apiserver-etcd-client" certificate and key
[certs] Generating "sa" key and public key
[kubeconfig] Using kubeconfig folder "/etc/kubernetes"
[kubeconfig] Writing "admin.conf" kubeconfig file
[kubeconfig] Writing "kubelet.conf" kubeconfig file
[kubeconfig] Writing "controller-manager.conf" kubeconfig file
[kubeconfig] Writing "scheduler.conf" kubeconfig file
[kubelet-start] Writing kubelet environment file with flags to file "/var/lib/kubelet/kubeadm-flags.env"
[kubelet-start] Writing kubelet configuration to file "/var/lib/kubelet/config.yaml"
[kubelet-start] Starting the kubelet
[control-plane] Using manifest folder "/etc/kubernetes/manifests"
[control-plane] Creating static Pod manifest for "kube-apiserver"
[control-plane] Creating static Pod manifest for "kube-controller-manager"
[control-plane] Creating static Pod manifest for "kube-scheduler"
[etcd] Creating static Pod manifest for local etcd in "/etc/kubernetes/manifests"
[wait-control-plane] Waiting for the kubelet to boot up the control plane as static Pods from directory "/etc/kubernetes/manifests". This can take up to 4m0s
[apiclient] All control plane components are healthy after 34.004408 seconds
[upload-config] Storing the configuration used in ConfigMap "kubeadm-config" in the "kube-system" Namespace
[kubelet] Creating a ConfigMap "kubelet-config-1.20" in namespace kube-system with the configuration for the kubelets in the cluster
[upload-certs] Skipping phase. Please see --upload-certs
[mark-control-plane] Marking the node ubuntu00 as control-plane by adding the labels "node-role.kubernetes.io/master=''" and "node-role.kubernetes.io/control-plane='' (deprecated)"
[mark-control-plane] Marking the node ubuntu00 as control-plane by adding the taints [node-role.kubernetes.io/master:NoSchedule]
[bootstrap-token] Using token: rawj1e.2rh9si2g7ii1wdb0
[bootstrap-token] Configuring bootstrap tokens, cluster-info ConfigMap, RBAC Roles
[bootstrap-token] configured RBAC rules to allow Node Bootstrap tokens to get nodes
[bootstrap-token] configured RBAC rules to allow Node Bootstrap tokens to post CSRs in order for nodes to get long term certificate credentials
[bootstrap-token] configured RBAC rules to allow the csrapprover controller automatically approve CSRs from a Node Bootstrap Token
[bootstrap-token] configured RBAC rules to allow certificate rotation for all node client certificates in the cluster
[bootstrap-token] Creating the "cluster-info" ConfigMap in the "kube-public" namespace
[kubelet-finalize] Updating "/etc/kubernetes/kubelet.conf" to point to a rotatable kubelet client certificate and key
[addons] Applied essential addon: CoreDNS
[addons] Applied essential addon: kube-proxy

Your Kubernetes control-plane has initialized successfully!

To start using your cluster, you need to run the following as a regular user:

  mkdir -p $HOME/.kube
  sudo cp -i /etc/kubernetes/admin.conf $HOME/.kube/config
  sudo chown $(id -u):$(id -g) $HOME/.kube/config

Alternatively, if you are the root user, you can run:

  export KUBECONFIG=/etc/kubernetes/admin.conf

You should now deploy a pod network to the cluster.
Run "kubectl apply -f [podnetwork].yaml" with one of the options listed at:
  https://kubernetes.io/docs/concepts/cluster-administration/addons/

Then you can join any number of worker nodes by running the following on each as root:

kubeadm join 192.168.56.100:6443 --token rawj1e.2rh9si2g7ii1wdb0 \
    --discovery-token-ca-cert-hash sha256:019658e97812164470c10dbbef50a742216666120a31f8d709f2686535f8494f
成功したようだ。
ただし一番最初のほうに「DockerのVersionが有効じゃねえよ」という警告が出ているのがわかる。
これは「1-2.Install Docker」の(8)で記述した適切なDockerのVersionをインストールしよう、の項で述べたことに関連している。
ただ上でかいた通りここではもう面倒くさいのでそのまま先に進めることにする。
余談だが、Dockerをcfgroupのままにしている(systemdに変更していない)場合も、同じくらいの箇所で警告が出る(ただし「警告」なので作業は止まらないで先に進んでくれる)
また、CPU数が2未満だとエラーになって先に進まない。
こっちは「エラー」なので作業が止まり、Kubernetesのインストールはここでストップしてしまう。
このため「1-1.Ubuntuのセットアップ」の(6)でCPU数を最低2以上にするよう書いている。
ただこれ忘れた場合も、一度仮想マシンの電源を落としてから、VirtualBoxの仮想マシンの設定でCPU数変えて再起動すれば、先に進める。
(8)
kubeadm initのラストに出てきているメッセージに従い、以下コマンドを実行していく
$  mkdir -p $HOME/.kube
$  sudo cp -i /etc/kubernetes/admin.conf $HOME/.kube/config
$  sudo chown $(id -u):$(id -g) $HOME/.kube/config
(9)
flannelをインストールする。
手順はflannelのgithubから。
$ kubectl apply -f https://raw.githubusercontent.com/coreos/flannel/master/Documentation/kube-flannel.yml
(10)
PODの状況を確認してみる。
$ kubectl get pod --all-namespaces
NAMESPACE     NAME                               READY   STATUS    RESTARTS   AGE
kube-system   coredns-74ff55c5b-gmwkj            1/1     Running   0          11m
kube-system   coredns-74ff55c5b-sszfp            1/1     Running   0          11m
kube-system   etcd-ubuntu00                      1/1     Running   0          11m
kube-system   kube-apiserver-ubuntu00            1/1     Running   0          11m
kube-system   kube-controller-manager-ubuntu00   1/1     Running   0          11m
kube-system   kube-flannel-ds-hb5m2              1/1     Running   0          4m34s
kube-system   kube-proxy-w45d6                   1/1     Running   0          11m
kube-system   kube-scheduler-ubuntu00            1/1     Running   0          11m
このように、全部のPODのstatusが「Running」になってればOK。
corednsは、kubeadm init直後は絶対Runningにならない仕様?のようだ。
自分の場合も最初はCrashLoopbackoffが続いていたが、flannelいれたら直後にRunningになった。
それ以外だとkubeletの起動オプションに真の(実態の)resolv.confを指定してあげる(+kubelet再起動)でも直るケースがあるという。
この対応は1-3.Install Kubernetesの(6)項に書いてある内容で満たしている。
ただ最初からこの引数をいれていたので、これが影響していたのか、flannelいれたことが理由だったのか、わかっていない。
一旦動いてるのでヨシ!として先に進む。
1-4. Install Node.js
こちらのブログ記事にしたがってNode.jsをインストールする。
(1)
ホームディレクトリに移動してインストール用のshを落としてくる。
$ cd ~
$ curl -sL https://deb.nodesource.com/setup_14.x -o nodesource_setup.sh
(2)
shell実行
$ sudo bash nodesource_setup.sh

## Installing the NodeSource Node.js 14.x repo...


## Populating apt-get cache...

+ apt-get update
Hit:1 http://jp.archive.ubuntu.com/ubuntu focal InRelease
Get:2 http://jp.archive.ubuntu.com/ubuntu focal-updates InRelease [114 kB]
Get:3 http://jp.archive.ubuntu.com/ubuntu focal-backports InRelease [101 kB]
Hit:4 https://download.docker.com/linux/ubuntu focal InRelease
Get:5 http://jp.archive.ubuntu.com/ubuntu focal-security InRelease [109 kB]
Hit:6 https://packages.cloud.google.com/apt kubernetes-xenial InRelease
Fetched 324 kB in 2s (204 kB/s)
Reading package lists... Done

## Confirming "focal" is supported...

+ curl -sLf -o /dev/null 'https://deb.nodesource.com/node_14.x/dists/focal/Release'

## Adding the NodeSource signing key to your keyring...

+ curl -s https://deb.nodesource.com/gpgkey/nodesource.gpg.key | apt-key add -
OK

## Creating apt sources list file for the NodeSource Node.js 14.x repo...

+ echo 'deb https://deb.nodesource.com/node_14.x focal main' > /etc/apt/sources.list.d/nodesource.list
+ echo 'deb-src https://deb.nodesource.com/node_14.x focal main' >> /etc/apt/sources.list.d/nodesource.list

## Running `apt-get update` for you...

+ apt-get update
Hit:1 http://jp.archive.ubuntu.com/ubuntu focal InRelease
Hit:2 https://download.docker.com/linux/ubuntu focal InRelease
Get:3 http://jp.archive.ubuntu.com/ubuntu focal-updates InRelease [114 kB]
Get:5 https://deb.nodesource.com/node_14.x focal InRelease [4,583 B]
Get:6 http://jp.archive.ubuntu.com/ubuntu focal-backports InRelease [101 kB]
Get:7 http://jp.archive.ubuntu.com/ubuntu focal-security InRelease [109 kB]
Hit:4 https://packages.cloud.google.com/apt kubernetes-xenial InRelease
Get:8 https://deb.nodesource.com/node_14.x focal/main amd64 Packages [767 B]
Fetched 329 kB in 2s (194 kB/s)
Reading package lists... Done

## Run `sudo apt-get install -y nodejs` to install Node.js 14.x and npm
## You may also need development tools to build native addons:
     sudo apt-get install gcc g++ make
## To install the Yarn package manager, run:
     curl -sL https://dl.yarnpkg.com/debian/pubkey.gpg | sudo apt-key add -
     echo "deb https://dl.yarnpkg.com/debian/ stable main" | sudo tee /etc/apt/sources.list.d/yarn.list
     sudo apt-get update && sudo apt-get install yarn
(3)
Node.jsインストール
$ sudo apt install nodejs
Reading package lists... Done
Building dependency tree
Reading state information... Done
The following NEW packages will be installed:
  nodejs
0 upgraded, 1 newly installed, 0 to remove and 78 not upgraded.
Need to get 24.9 MB of archives.
After this operation, 120 MB of additional disk space will be used.
Get:1 https://deb.nodesource.com/node_14.x focal/main amd64 nodejs amd64 14.15.1-deb-1nodesource1 [24.9 MB]
Fetched 24.9 MB in 7s (3,793 kB/s)
Selecting previously unselected package nodejs.
(Reading database ... 71383 files and directories currently installed.)
Preparing to unpack .../nodejs_14.15.1-deb-1nodesource1_amd64.deb ...
Unpacking nodejs (14.15.1-deb-1nodesource1) ...
Setting up nodejs (14.15.1-deb-1nodesource1) ...
Processing triggers for man-db (2.9.1-1) ...
versionを調べてみる
$ node -v
v14.15.1
うむ。ちゃんと入ったようだ。
Ubuntuの場合、普通にapt-get install nodejsでインストールするとversion8とか古いのが入っちゃうので、あえて最新をインストールする手順にしてみた。
1-5. Dockerイメージ作成
(1)
作業用ディレクトリ作成
$ mkdir -p ~/work/testpj
$ cd ~/work/testpj
(2)
npm init
全部未入力Enterで良い。(まあ入力したい人は入力してもよいが面倒なので初期値のまま)
$ npm init
This utility will walk you through creating a package.json file.
It only covers the most common items, and tries to guess sensible defaults.

See `npm help init` for definitive documentation on these fields
and exactly what they do.

Use `npm install <pkg>` afterwards to install a package and
save it as a dependency in the package.json file.

Press ^C at any time to quit.
package name: (testpj)
version: (1.0.0)
description:
entry point: (index.js)
test command:
git repository:
keywords:
author:
license: (ISC)
About to write to /home/rmbs/work/testpj/package.json:

{
  "name": "testpj",
  "version": "1.0.0",
  "description": "",
  "main": "index.js",
  "scripts": {
    "test": "echo \"Error: no test specified\" && exit 1"
  },
  "author": "",
  "license": "ISC"
}


Is this OK? (yes) yes
(3)
以下の内容でindex.jsを作成する
const PORT = 4000;

const os = require('os');
const express = require("express");
const app = express();

app.get("/test/:message" , (req,res) => {

  const messageText = req.params.message;
  const hostName = os.hostname();

  const responseMessage = `request message:${messageText}
hostname:${hostName}`

  res.send(responseMessage);

});

app.listen(PORT , () => {

  console.log("server listened by port " + String(PORT) + " ... ");

});
これが今回動かす「アプリケーション」の実態になる。
見ればわかるが、全然大したことやってない。
/test/xxxでリクエストを受けたらレスポンス返すだけの、ただそれだけだ。
そういう意味ではExpress使う必要もないかもしれない。
個人的にExpressに慣れていたので迷うことなく選んでしまったが…
(4)
そういうわけでExpressをいれておく
$ npm install --save express
npm notice created a lockfile as package-lock.json. You should commit this file.
npm WARN [email protected] No description
npm WARN [email protected] No repository field.

+ [email protected]
added 50 packages from 37 contributors and audited 50 packages in 6.251s
found 0 vulnerabilities
(5)
Node.js単独実行して動作確認する。
$ node index.js
server listened by port 4000 ...
このあと、ホストOS側からcurlを使って以下のコマンドでアクセスしてみる。
>curl http://192.168.56.100:4000/test/ThisIsTestFromHostOS
request message:ThisIsTestFromHostOS
hostname:ubuntu00
これが帰ってくればOK。
動いてるのが確認できる。
(6)
Dockerファイルをつくる
FROM alpine:latest

RUN apk add --no-cache npm nodejs

WORKDIR /root/testpj
COPY index.js /root/testpj/
COPY package.json /root/testpj/
COPY package-lock.json /root/test-nodejs/

RUN npm install

CMD ["node" , "index.js"]
(7)
Dockerイメージ作成
$ docker build -t testpj:0.1 .
(8)
Dockerコンテナ起動
$ docker run --rm -d -it -p 4000:4000 testpj:0.1
このあと、Node.js単独実行時と同様、ホストOS側からcurlを使って以下のコマンドでアクセスしてみる。
>curl http://192.168.56.100:4000/test/ThisIsTestFromHostOS2DockerContainer
request message:ThisIsTestFromHostOS2DockerContainer
hostname:a0cc04c3b2fd
これが帰ってくればOK。
Dockerコンテナも正常に動いてるのが確認できる。
用が済んだらdocker stop a0cc04c3b2fdで止める(コンテナIDは適宜環境に合わせて変更すること)
1-6. Docker registry
こういうのは普通は各クラウドベンダーが用意しているようなprivateなDockerレジストリを使うと思われるが、今回はローカルで全部をやりくりするので、レジストリもローカルにあげる。
(1)
registryを用意
$ docker pull registry
Using default tag: latest
latest: Pulling from library/registry
cbdbe7a5bc2a: Pull complete
47112e65547d: Pull complete
46bcb632e506: Pull complete
c1cc712bcecd: Pull complete
3db6272dcbfa: Pull complete
Digest: sha256:8be26f81ffea54106bae012c6f349df70f4d5e7e2ec01b143c46e2c03b9e551d
Status: Downloaded newer image for registry:latest
docker.io/library/registry:latest
(2)
作業用ディレクトリを作成
$ mkdir -p ~/work/registry
(3)
とりあえず5000番ポートで起動しておく。
$ docker run --rm -d -p 5000:5000 -v /home/rmbs/work/registry:/var/lib/registry -it registry:latest
791bcec26904ac7e0e036bf60ebd6189643487a0916a9c7ac7d93a9eba6086ba
一応curl -i -v http://localhost:5000/とかやってみてHTTP 200になること(正常に起動していること)くらいは確認してみてもいいかもしれません。
(4)
さっき↑でつくったtestpjのDockerイメージを、このDockerレジストリにpushする。
まずはタグ付け。
$ docker image tag testpj:0.1 ubuntu00:5000/testpj:0.1
で、push
$ docker push ubuntu00:5000/testpj:0.1
The push refers to repository [ubuntu00:5000/testpj]
4d20f555173f: Pushed
ca4728af37b9: Pushed
9d8fff39ccbf: Pushed
12717dd9a042: Pushed
a0c830d31641: Pushed
86d3ba0de031: Pushed
f4666769fca7: Pushed
0.1: digest: sha256:36961de57a6efe9e31095b2557cf099f6f0cdabdc45956062244ae4372c8dce0 size: 1780
無事にpushされた。
といってもローカルでつくったイメージがローカルの別の場所にまた入ったってだけなのだが。
面白そうなのでどこに入ったか見てみる。
$ docker exec -it 791bcec26904 /bin/sh
/ # cd /var
/var # cd lib/
/var/lib # pwd
/var/lib
/var/lib # ls
apk       misc      registry  udhcpd
/var/lib # cd registry/
/var/lib/registry # ls
docker
/var/lib/registry # cd docker/
/var/lib/registry/docker # ls
registry
/var/lib/registry/docker # cd registry/
/var/lib/registry/docker/registry # ls
v2
/var/lib/registry/docker/registry # cd v2/
/var/lib/registry/docker/registry/v2 # ls
blobs         repositories
/var/lib/registry/docker/registry/v2 # cd repositories/
/var/lib/registry/docker/registry/v2/repositories # pwd
/var/lib/registry/docker/registry/v2/repositories
/var/lib/registry/docker/registry/v2/repositories # ls
testpj
「testpj」があった。
この場所はDocker run実行時の-vオプションの指定-v /home/rmbs/work/registry:/var/lib/registryによる。
ローカルでは/home/rmbs/work/registryの配下、Dockerコンテナ上では/var/lib/registry配下に、それぞれイメージがpushされていることになる。
指定したディレクトリをルートとした場合の、イメージの格納箇所にあたる両者の相対的なディレクトリパスは一致している
[2] Workerノード作成・参加
Masterノードを一通り作り終えたので、今度はWorkerノードをつくる。
ただ途中までは基本的にMasterノードの作業と一緒。
2-1. Ubuntuセットアップ、Install Docker、Install Kubernetes
Ubuntu セットアップ
途中、IPアドレスを以下のように変える。
| 項目 | 値 |
|---|---|
| Subnet | 192.168.56.0/24 |
| Address | 192.168.56.101 |
| Gateway | 255.255.255.0 |
| Name Servers | 192.168.56.0 |
また、サーバー名もこれに合わせて変えておく。
| 項目 | 値 |
|---|---|
| Your name | rmbs |
| your server's name | ubuntu01 |
| pick a username | rmbs |
あとは同じ。
OpenSSHはセットアップ時に入れておき、Dockerは後で手動で入れる。
OpenSSHを入れておけば、Masterノードからssh 192.168.56.101とかで入れる。
Docker インストール
ほぼ同じなのだが、「1-2. Install Docker」の(11)で、/etc/docker/daemon.jsonをつくるところだけちょっとだけ違う。
「insecure-registries」の値を、Masterノードのマシン名に変えておく(Masterノードで作成したものは自分自身だったのでlocalhostにしてあったが、Workerノード側から見る場合はMasterノードのマシン名にしておく必要がある)
{
      "exec-opts": ["native.cgroupdriver=systemd"],
      "insecure-registries": [
      "ubuntu00:5000"
      ]
}
Kubernetesインストール
「1-3. Install Kubernetes」の(6)まで同じ。
ただし(6)で指定するnode-ipは自身のIPにする必要があるので、このケースだと
export KUBELET_EXTRA_ARGS="--node-ip=192.168.56.101 --resolv-conf=/run/systemd/resolve/resolv.conf"
になる点に注意。
(7)以降はMasterノード用のステップなので、ここから先は違う作業になる。
kubeconfigをもってくる
これは別にやらなくてもいいかも。
個人的にWorkerノードでもkubectlを叩きたかったので毎回やっている。
MasterノードにあるkubeconfigをSCPでWorkerノードの同じ場所に持ってくる。
$ mkdir  /home/rmbs/.kube/
$ scp [email protected]:/home/rmbs/.kube/config /home/rmbs/.kube/
/etc/hostsにMasterノードのエントリを追記
MasterノードにあげているローカルのDockerレジストリにアクセスするため、hostsに名前解決のための情報を描きこんであげる。
$ sudo vi /etc/hosts
エントリは以下の1行
192.168.56.100 ubuntu00
kubeadm join
Masterノードでkubeadm initしたときに、最後に出てきたkubeadm join ...というコマンドを、Workerノードで実行する。
この例だと以下。
なおsudo必要である。
$ sudo kubeadm join 192.168.56.100:6443 --token rawj1e.2rh9si2g7ii1wdb0 \
    --discovery-token-ca-cert-hash sha256:019658e97812164470c10dbbef50a742216666120a31f8d709f2686535f8494f

[preflight] Running pre-flight checks
        [WARNING SystemVerification]: this Docker version is not on the list of validated versions: 20.10.0. Latest validated version: 19.03
[preflight] Reading configuration from the cluster...
[preflight] FYI: You can look at this config file with 'kubectl -n kube-system get cm kubeadm-config -o yaml'
[kubelet-start] Writing kubelet configuration to file "/var/lib/kubelet/config.yaml"
[kubelet-start] Writing kubelet environment file with flags to file "/var/lib/kubelet/kubeadm-flags.env"
[kubelet-start] Starting the kubelet
[kubelet-start] Waiting for the kubelet to perform the TLS Bootstrap...

This node has joined the cluster:
* Certificate signing request was sent to apiserver and a response was received.
* The Kubelet was informed of the new secure connection details.

Run 'kubectl get nodes' on the control-plane to see this node join the cluster.
成功。
なお、joinコマンドのオプションの--tokenに指定している値には有効期限があり、約24時間で切れる(らしい。正確な期限を探れなかった。昔から確か「1日」というのは聴いたことがある)。
なので、kubeadm initしてから24時間以上経過してからこのコマンド実行しても失敗する。
そういう場合は、Masterノード側で以下コマンドを叩くと、新しいトークンでjoinコマンドを生成して、標準出力してくれる。
↓みたいな感じ。
$ kubeadm token create --print-join-command
kubeadm join 192.168.56.100:6443 --token iksqeb.uatq73dggmfc2wc4     --discovery-token-ca-cert-hash sha256:019658e97812164470c10dbbef50a742216666120a31f8d709f2686535f8494f
Nodeの参加状況を確認
kubeadm join実行後の標準出力に従ってkubectl get nodesをたたいてみる
$ kubectl get nodes
NAME       STATUS   ROLES                  AGE     VERSION
ubuntu00   Ready    control-plane,master   3h5m    v1.20.0
ubuntu01   Ready    <none>                 5m41s   v1.20.0
「ubuntu01」の行が出来上がっていて、「STATUS」が「Ready」になってれば成功。
なお、「Ready」になるまで若干の時間がかかる。
[3] Masterノードでアプリケーションのdeploy
(1)
適当な作業ディレクトリに移動し、マニフェストファイルをつくる。
apiVersion: apps/v1
kind: Deployment
metadata:
  name: testpj-deployment
  labels:
    app: testpj-deployment
spec:
  replicas: 2
  selector:
    matchLabels:
      app: testpj-app
  template:
    metadata:
      labels:
        app: testpj-app
    spec:
      containers:
      - name: testpj-app
        image: ubuntu00:5000/testpj:0.1
        imagePullPolicy: Always
        ports:
        - name: testpj-app
          containerPort: 4000
          protocol: TCP
これをmanifest.ymlというファイル名で保存する。
(2)
Kubernetesに食わす。
$ kubectl apply -f manifest.yml
deployment.apps/testpj-deployment created
成功したっぽい。
kubectlでPODの状況を見てみる。
k$ kubectl get pod
NAME                                READY   STATUS    RESTARTS   AGE
testpj-deployment-d898574b5-6wv9x   1/1     Running   0          79s
testpj-deployment-d898574b5-ndtjp   1/1     Running   0          79s
うむ。
ReplicaSet:2に従って2つのPODがdeployされている。
(3)
例えば1つのPODの中身をkubectl describe podで見てみると…
$ kubectl describe pod testpj-deployment-d898574b5-6wv9x
Name:         testpj-deployment-d898574b5-6wv9x
Namespace:    default
Priority:     0
Node:         ubuntu01/10.0.2.15
Start Time:   Mon, 14 Dec 2020 13:38:24 +0000
Labels:       app=testpj-app
              pod-template-hash=d898574b5
Annotations:  <none>
Status:       Running
IP:           10.244.1.2
IPs:
  IP:           10.244.1.2
Controlled By:  ReplicaSet/testpj-deployment-d898574b5
Containers:
  testpj-app:
    Container ID:   docker://748a1d2177b7e392df7cd1046614e4a1b2178a249805e483e27620b3a72cd0f1
    Image:          ubuntu00:5000/testpj:0.1
    Image ID:       docker-pullable://ubuntu00:5000/testpj@sha256:36961de57a6efe9e31095b2557cf099f6f0cdabdc45956062244ae4372c8dce0
    Port:           4000/TCP
    Host Port:      0/TCP
    State:          Running
      Started:      Mon, 14 Dec 2020 13:38:35 +0000
    Ready:          True
    Restart Count:  0
    Environment:    <none>
    Mounts:
      /var/run/secrets/kubernetes.io/serviceaccount from default-token-jqvvq (ro)
Conditions:
  Type              Status
  Initialized       True
  Ready             True
  ContainersReady   True
  PodScheduled      True
Volumes:
  default-token-jqvvq:
    Type:        Secret (a volume populated by a Secret)
    SecretName:  default-token-jqvvq
    Optional:    false
QoS Class:       BestEffort
Node-Selectors:  <none>
Tolerations:     node.kubernetes.io/not-ready:NoExecute op=Exists for 300s
                 node.kubernetes.io/unreachable:NoExecute op=Exists for 300s
Events:
  Type    Reason     Age   From               Message
  ----    ------     ----  ----               -------
  Normal  Scheduled  97s   default-scheduler  Successfully assigned default/testpj-deployment-d898574b5-6wv9x to ubuntu01
  Normal  Pulling    94s   kubelet            Pulling image "ubuntu00:5000/testpj:0.1"
  Normal  Pulled     88s   kubelet            Successfully pulled image "ubuntu00:5000/testpj:0.1" in 6.041771668s
  Normal  Created    86s   kubelet            Created container testpj-app
  Normal  Started    86s   kubelet            Started container testpj-app
こんな感じになっている。
最後のほう、「Events」のところに、PODがdeployされるまでの主なイベントが載っている。
3行目の 「Successfully pulled image "ubuntu00:5000/testpj:0.1" in 6.041771668s」は、MasterノードにあげてあったローカルのDockerレジストリからのイメージのPullを、Workerノード側から実行して成功した、ことを示している。
Workerノードの/etc/hostsにMasterノードのエントリを書いて、/etc/docker/daemon.jsonのinsecure-registriesにMasterノードで立ち上げたローカルレジストリの情報を書いてないと恐らくここ(イメージのpull)が失敗する。
なお、当たり前だが、現時点ではWorkerノードが1台しかいないので、deploy先は1つのサーバに集中する。
なので1つのWorkerノードに2つのPODが集中配備されている形になっている。
このため、Workerノード1台がサーバごと死んだ場合、ReplicaSetを2にしておいたところで、その2つのレプリカが両方ともそろって死ぬので、あまりありがたみがない(可用性が担保できない)。
これは後にもう一つWorkerノードを追加して試してみる。
(4)
今度はサービスを作る。
これはKubernetesの公式のDocにしたがってコマンドで作ってみよう。
$ kubectl expose deployment testpj-deployment --type=NodePort --name=testpj-svc
service/testpj-svc exposed
成功したようだ。
kubectlで見てみる。
$ kubectl get svc
NAME         TYPE        CLUSTER-IP       EXTERNAL-IP   PORT(S)          AGE
kubernetes   ClusterIP   10.96.0.1        <none>        443/TCP          31h
testpj-svc   NodePort    10.102.136.185   <none>        4000:32568/TCP   11s
うむ、確かにサービス「testpj-svc」が出来あがっているのが確認できる。
(5)
PODのときと同様、サービスの中身をkubectl describe svcコマンドで覗いてみる。
$ kubectl describe svc testpj-svc
Name:                     testpj-svc
Namespace:                default
Labels:                   app=testpj-deployment
Annotations:              <none>
Selector:                 app=testpj-app
Type:                     NodePort
IP Families:              <none>
IP:                       10.102.136.185
IPs:                      10.102.136.185
Port:                     <unset>  4000/TCP
TargetPort:               4000/TCP
NodePort:                 <unset>  32568/TCP
Endpoints:                10.244.1.2:4000,10.244.1.3:4000
Session Affinity:         None
External Traffic Policy:  Cluster
Events:                   <none>
↑の「NodePort」の部分に注目する。
この例だと32568.
(6)
curlでアクセスしてみる。
アクセス先はWorkerノードのIPアドレス、ポート番号は↑で調べたNodePortである。
$ curl http://192.168.56.101:32568/test/aaa
request message:aaa
hostname:testpj-deployment-d898574b5-ndtjprmbs

...

$ curl http://192.168.56.101:32568/test/aaa
request message:aaa
hostname:testpj-deployment-d898574b5-6wv9xrmbs
何度かアクセスすると「hostname」の部分が変化する。
Serviceオブジェクトを介して、2つのPODに適切にアクセスが分散していることが確認できる。
ただ上述した通り、1台のサーバ上で2つのPODが動いてるだけなので、見た目がそう見えるというだけで、実態として可用性を意識したアプリ構成にはなっていない。
なお、ポート番号が合ってるのに繋がらない場合、Workerノード側のファイアウォールが邪魔している可能性がある(らしい)。
以下のコマンドで当該ポートの通信を許可できる。
$ sudo ufw allow 32568
[4] Workerノードを追加する
というわけでWorkerノード(サーバー)をもう1台追加してみる。
やり方は「[2] Workerノード作成・参加」とほぼ同じ。
相変わらずIPアドレスとかその辺は適宜変えていく。
今回は 「ubuntu02」、「192.168.56.102」のサーバーとする。
/etc/hostsへMasterノードのエントリ追加するのも忘れずに。
とりあえずjoin
kubeadmm join後にノードがReadyになるまで待つ。
$ kubectl get nodes
NAME       STATUS   ROLES                  AGE    VERSION
ubuntu00   Ready    control-plane,master   2d4h   v1.20.0
ubuntu01   Ready    <none>                 2d1h   v1.20.0
ubuntu02   Ready    <none>                 66s    v1.20.0
66s前後でReadyになった。
deploy先の調整
ただUbuntu02を参加させただけではPODのdeploy状況は変化しない。
つまりこの段階ではまだUbuntu01に集中配備されている状態が継続中。
$ kubectl get pod --output=wide
NAME                                READY   STATUS    RESTARTS   AGE   IP           NODE       NOMINATED NODE   READINESS GATES
testpj-deployment-d898574b5-6wv9x   1/1     Running   0          21h   10.244.1.2   ubuntu01   <none>           <none>
testpj-deployment-d898574b5-ndtjp   1/1     Running   0          21h   10.244.1.3   ubuntu01   <none>           <none>
[5] Masterノードでの追加作業1(アプリケーションの改修とdeploy)
アプリケーション修正
Masterノードで一度testpjのプロジェクトルートディレクトリに戻る
$ cd /home/rmbs/work/testpj
で、index.jsを少しいじくってみる。
const PORT = 4000;

const os = require('os');
const express = require("express");
const app = express();

app.get("/test/:message" , (req,res) => {

  const messageText = req.params.message;
  const hostName = os.hostname();

  const responseMessage = `request message:${messageText}
hostname:${hostName}
update!`; // ←ここを追加 しただけ

  res.send(responseMessage);

});

app.listen(PORT , () => {

  console.log("server listened by port " + String(PORT) + " ... ");

});
非常に僅かな修正を加えた。
イメージの再生成
修正版アプリケーションのDockerイメージをつくる。
さっきつくったのはVersion:0.1だったが、ちょびっと修正したので、今回はVersion:0.2とする。
$ docker build -t testpj:0.2 .
タグ付け
$ docker image tag testpj:0.2 ubuntu00:5000/testpj:0.2
push
$ docker push ubuntu00:5000/testpj:0.2
The push refers to repository [ubuntu00:5000/testpj]
9a2feaf5c9d0: Pushed
f4c3f2529aa7: Pushed
0fd570399ced: Pushed
bcd6709e195b: Pushed
a0c830d31641: Layer already exists
86d3ba0de031: Layer already exists
f4666769fca7: Layer already exists
0.2: digest: sha256:42763a6494c90987de4922022e413c0f432a0a13f678a725382398e09e50f9ad size: 1780
manifest修正
「spec-template-spec-containers-image」の部分を、今回作ったVersion:0.2のイメージに変更する。
apiVersion: apps/v1
kind: Deployment
metadata:
  name: testpj-deployment
  labels:
    app: testpj-deployment
spec:
  replicas: 2
  selector:
    matchLabels:
      app: testpj-app
  template:
    metadata:
      labels:
        app: testpj-app
    spec:
      containers:
      - name: testpj-app
        image: ubuntu00:5000/testpj:0.2 # ←ここ変更
        imagePullPolicy: Always
        ports:
        - name: testpj-app
          containerPort: 4000
          protocol: TCP
apply
上記のmanifestをapplyする。
$ kubectl apply -f manifest.yml
deployment.apps/testpj-deployment configured
deploy中の状況をkubectl get podで覗いてみる
$ kubectl get pod
NAME                                 READY   STATUS        RESTARTS   AGE
testpj-deployment-79cfc5dc8d-bgjdr   1/1     Running       0          20s
testpj-deployment-79cfc5dc8d-tbf84   1/1     Running       0          29s
testpj-deployment-d898574b5-6wv9x    1/1     Terminating   0          22h
testpj-deployment-d898574b5-ndtjp    1/1     Terminating   0          22h
もともといた2つ(下の2行)が「Terminating」となり、自動で削除されている様子が確認できる。
一方で新たに追加された2つ(上の2行)が「Running」となり、アプリケーションの入れ替えが行われたことを確認できる。
そのまましばらく待っていると最終的に新しくできた2つのPODだけになる。
$ kubectl get pod
NAME                                 READY   STATUS    RESTARTS   AGE
testpj-deployment-79cfc5dc8d-bgjdr   1/1     Running   0          40s
testpj-deployment-79cfc5dc8d-tbf84   1/1     Running   0          49s
ただし、配備先のサーバを見てみると…
$ kubectl get pod --output=wide
NAME                                 READY   STATUS    RESTARTS   AGE   IP           NODE       NOMINATED NODE   READINESS GATES
testpj-deployment-79cfc5dc8d-bgjdr   1/1     Running   0          54s   10.244.2.3   ubuntu02   <none>           <none>
testpj-deployment-79cfc5dc8d-tbf84   1/1     Running   0          63s   10.244.2.2   ubuntu02   <none>           <none>
ぬううッ!
今度はUbuntu02だけに偏ってしまった…
多分最初の段階でUbuntu01に2POD集中型でdeployしてしまったため、rolloutで既存のPOD削除して新たにPODを生成しても、偏りやすくなってしまってるのだろう。
最初の段階からWorkerを2つにしておくべきだった。
しくった。。。
POD配備先調整の小細工
というわけでPODを1つ消してみる
$ kubectl delete pod  testpj-deployment-79cfc5dc8d-tbf84
pod "testpj-deployment-79cfc5dc8d-tbf84" deleted
するとKubernetesがDeploymentの定義(ReplicaSet:2)に従ってPODを2つに揃えようとする動きを取る。
つまり、消えたPOD1つ分を新たに生成して、Workerノードにdeployする。
$ kubectl get pod -o wide
NAME                                 READY   STATUS    RESTARTS   AGE     IP           NODE       NOMINATED NODE   READINESS GATES
testpj-deployment-79cfc5dc8d-bgjdr   1/1     Running   0          6m44s   10.244.2.3   ubuntu02   <none>           <none>
testpj-deployment-79cfc5dc8d-nfwqr   1/1     Running   0          50s     10.244.1.4   ubuntu01   <none>           <none>
おおッ!!
新たにできあがった「testpj-deployment-79cfc5dc8d-nfwqr」(2行目)が、新たに追加したWorkerノードubuntu01にdeployされた。
これでUbuntu01かUbuntu02のどちらかのサーバが死んでも、縮退運転でサービスの運用が続けられるというわけだ!
ただ、ちょっと調べた感じ、Deploymentでのdeploy先の制御は、基本的に完全にKubernetes任せで、このケースのように2台のサーバがあった場合、「どっちにどんな風にdeployされるかはわからない(保証できない)」らしい。
なので、今回も"たまたま"いい感じでUbuntu02に配備してもらえたというだけで、同じような状況でいつも自分が望むようにdeployされるわけではない、、、ということのようだ。
正直、この辺は自分がまだ知識不足で完全な制御方式をわかっていない。
後々もう少し探る(予定)。
なんか調べた感じ、Deschedulerというのがこの「deployの偏り」をいい感じに直して調整してくれるようだ。
ここもそのうち調べてみようと思う。
[6] Masterノードでの追加作業2(haproxy)
おまけ。
この状況だと、各WorkerノードそれぞれのIPとNodePortを指定してアクセスする形になり、実際のアプリケーション運用のイメージとは少し違う。
窓口となるLoad Balancerが前段にいて、そいつにアクセスすると、バックにいるWorkerノード(のPOD)にトラフィックがまわされる、というのが本来実現したいイメージだ。
ちょっと調べた感じ、haproxyというのを使うと、疑似的にLoad Balancingを実現できるようだ。
これをやってみる。
作業は公式のDocに書いてある内容に従う。
作業用ディレクトリ作成
$ mkdir -p /home/rmbs/work/haproxy
$ cd  /home/rmbs/work/haproxy
Dockerfile作成
FROM haproxy:1.7
COPY haproxy.cfg /usr/local/etc/haproxy/haproxy.cfg
haproxy.cfg作成
global
    daemon
    maxconn 1024
    pidfile /var/run/haproxy.pid
defaults
    mode http
    balance roundrobin
    timeout client 60s
    timeout connect 60s
    timeout server 60s
listen http-in
    bind *:4000
    server server1 192.168.56.101:32336 ←ここと
    server server2 192.168.56.102:32336 ←ことはserviceのNodePortの値で書き換える
docker build
$ docker build -t my-haproxy .
Sending build context to Docker daemon  3.072kB
Step 1/2 : FROM haproxy:1.7
 ---> ff4844108237
Step 2/2 : COPY haproxy.cfg /usr/local/etc/haproxy/haproxy.cfg
 ---> c54a20da71d0
Successfully built c54a20da71d0
Successfully tagged my-haproxy:latest
イメージできあがってるのを見る
$ docker images -a | grep haproxy
my-haproxy                           latest        c54a20da71d0   16 seconds ago      82.8MB
haproxy                              1.7           ff4844108237   4 days ago          82.8MB
*haproxy起動
$ docker run --rm -p 4000:4000 -d --name my-running-haproxy my-haproxy
アクセス
Masterノードの4000番ポート(haproxyのDockerコンテナが動いてるポート)に対してcurlでアクセスしてみる
$ curl http://localhost:4000/test/aaa
request message:aaa
hostname:testpj-deployment-79cfc5dc8d-jhwrc
update!

...

$ curl http://localhost:4000/test/aaa
request message:aaa
hostname:testpj-deployment-79cfc5dc8d-c8krv
update!
うむ。
localhost:4000という共通の入り口に対して、トラフィックの送信先となるバックエンド側が毎回異なる形でアクセスが振り分けられているようだ。
疑問
これいちいちhaproxy使わないと実現できないのかな。
自分でやっといてなんだが、なんか「イマイチ感」を感じてしまう。
ingressとか使えばhaproxyなんかなくても実現できたりするだろうか。
この辺調べられていない。
もう少し勉強が必要なポイントの1つのようだ。
おわりに
もともと復習と知識定着化を目的とした完全に自分のためだけのネタだったのだが、こうして仕上げてみると、Kubernetesの初心者向けHands-Onという感じに見えなくもなく、基本的なところは一通り触れられたような気はしており個人的には結構満足している。
基本的にはネットに転がってる知識をそのまま使ってるだけにすぎないので、インターネットって偉大だなと思う。w
そういう意味だと自分で試行錯誤した部分は「検索した」部分くらいしかなく、根底の能力が備わったかというと疑問符もつく。
例えば以下のような点は流れ作業の中で「まあいいか」で通してしまった
kubeadm init時のDockerバージョンに関する警告MSG- corednsがCrashLoopBackOffになる件が解決した真の理由
- PODのdeploy先Nodeの細かい制御方法
これはローカルで実現するにはなかなかいい題材ではあるので、これをもとに追及できればしていきたい。
だが、これだけ自分でやってみて改めて思うのは、コントロールプレーン(Masterノード)に当たる部分はクラウドベンダーのKubernetesのマネージドサービス使う方が絶対楽だってことですな。
むしろそっちは作成時点でWorkerもいい感じに作ってくれるし、こんな面倒なこといちいちする必要がない。
もう時代はマネージドサービスだなと思った。
ローカルでやるにしてもせめてminikube使ったほうが良いんでしょうね。
まあ、勉強になったからヨシとするか。
